Sashiko-style visible mending is the coziest way to save a torn pair of jeans: you hand-stitch a simple grid of running stitches over the tear, backed with a small cotton patch, and turn a hole into a design detail instead of hiding it. It is fun because the rhythm of the stitches is almost meditative, the honest time is about 1-2 hours of hands-on work (45-90 minutes for a small tear, up to 2 hours for a knee-sized repair), and there is no drying time at all. Follow along below, and grab the free printable supply list at the end so you can stitch with a checklist beside you.
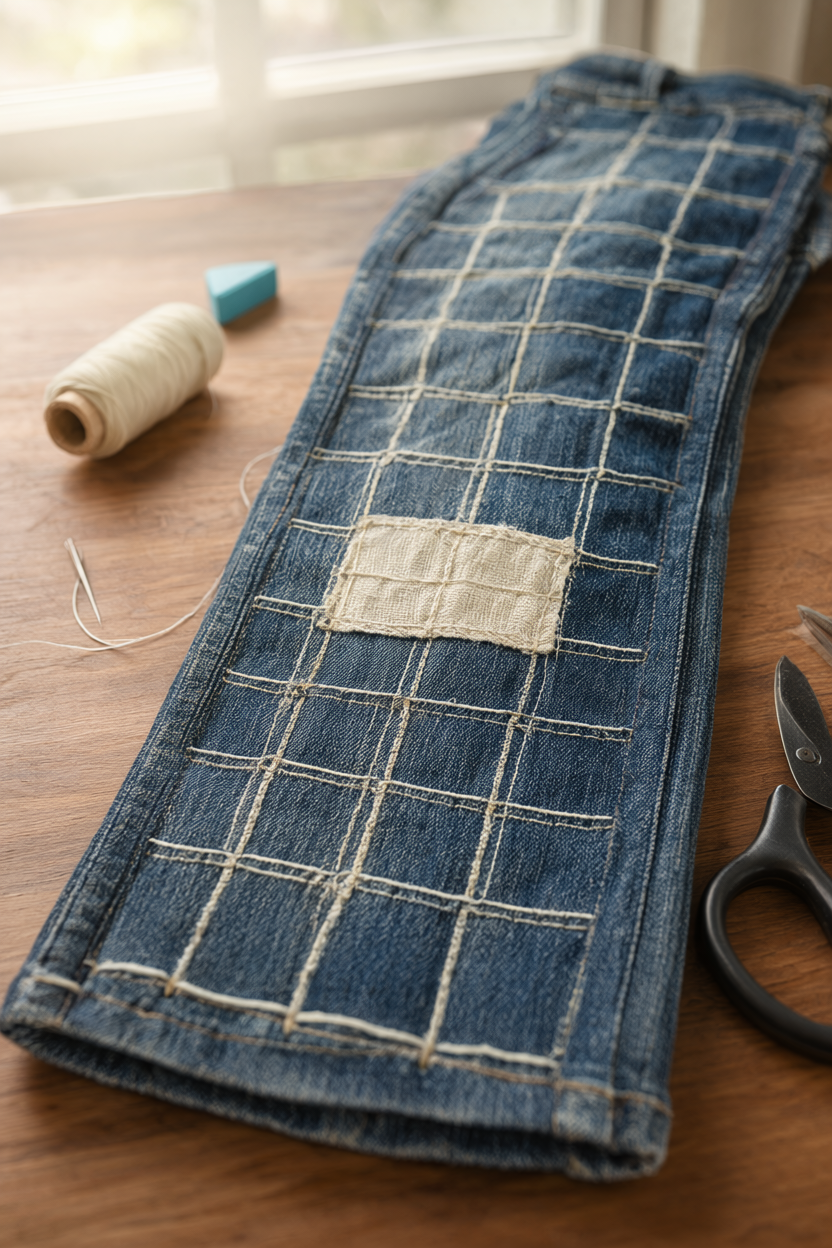
A small tear does not have to mean the end of a favorite pair of jeans. With a needle, a little thread, and a scrap of cotton, you can cover the damage with tidy rows of stitching that look intentional, not patched over. This repair works on denim jackets, totes, and aprons, and it is one of the most forgiving hand sewing projects you can try. If your stitches wobble, the pattern hides it beautifully.
At a Glance
- Difficulty: Beginner. If you can sew a basic running stitch, you can do this repair.
- Hands-on time: About 1-2 hours. A small tear takes 45-90 minutes; a knee-sized repair can take up to 2 hours.
- Drying or curing time: None. No glue, clay, or paint is involved, so the piece is ready to wear right away.
- Cost level: Low. Sashiko thread or perle cotton and a cotton scrap cost very little, especially if you already own a basic sewing kit.
What You’ll Need
You likely have several of these at home already, and everything else is easy to find at a craft store.
- 1 pair of jeans, denim jacket, or scrap denim to mend (or to practice on)
- 1 skein sashiko thread or perle cotton size 8 (about 18-24 in. cut per needle)
- 1 sashiko needle or embroidery needle with a large eye
- 1 lightweight cotton or thin denim patch, at least 1 in. larger than the tear on all sides
- Fabric scissors
- Water-erasable fabric pen or tailor’s chalk
- Small ruler
- Thimble (recommended for pushing through denim)
- Sewing pins or fabric clips
- Optional: iron and iron-on fusible interfacing
- Optional: 4-6 in. embroidery hoop
Step-by-Step Instructions
Work at a comfortable table with good light, and take the steps in order; each one sets up the next.
- Wash and dry the garment, then press it flat. Trim any loose threads around the tear so the fabric lies smooth before you patch it.
- Cut a lightweight cotton or thin denim patch about 1 inch larger than the tear on all sides. Thick layers are hard to stitch through by hand, so keep the patch thin.
- Slide the patch behind the tear (inside the leg or sleeve) and pin or clip it in place. If you want extra hold, fuse it with iron-on interfacing first.
- With a small ruler and a water-erasable pen or tailor’s chalk, draw a grid of parallel lines about 1/4 inch apart across the tear. Add perpendicular lines if you want the classic crossed sashiko look.
- Cut an 18-24 inch length of sashiko thread or perle cotton size 8, thread the needle, and tie a small knot at the far end. Short lengths tangle much less than long ones.
- Starting about 1/2 inch past the tear, sew short, even running stitches along each line, catching both the patch and the garment. Do not pull the thread tight: a little slack keeps the denim from puckering. A thimble makes it much easier to push through thick denim, and a 4-6 in. embroidery hoop can hold soft denim taut while you stitch.
- After each line, turn the work over and weave the tail through the stitches on the back (or tie a small knot) instead of knotting on the front.
- Continue until the grid covers the tear and the patch is anchored all around. Add waves or crosses to turn the repair into a pattern if you like.
- Wipe away the pen marks with a damp cloth, press the mended area flat with a warm iron (keep your fingers clear of the hot plate), and wash the garment as usual, inside out.
A quick safety reminder: needles are sharp and irons are hot. Supervise younger kids, keep fingers out of the needle’s path, and wear a thimble when you push through thick seams.
Why Visible Mending Is Trending Right Now
Visible mending is trending because it solves two problems at once. Instead of throwing a garment away at the first sign of wear, you extend its life with a few feet of thread, which keeps denim out of landfill and saves money. It is also beginner-friendly: the whole repair is one simple stitch, so you can learn it in a single sitting. Best of all, visible mending makes the repair the point. A stitched grid says this piece is loved, not damaged, and every mend becomes a design detail that is completely your own.
Pattern Variations: Molehill Grid, Seigaiha Waves, and Jujizashi Crosses
Once your first grid is finished, changing the pattern is as easy as changing the lines you draw.
- The classic molehill grid: even parallel rows of running stitches, the fastest and most forgiving option.
- Seigaiha waves: draw rows of overlapping half circles and stitch along them for a soft ocean-wave look.
- Jujizashi crosses: stitch small crosses at regular intervals for a crisp, geometric texture.
- Two-color contrast: use cream thread on indigo denim, or alternate two colors row by row for a playful checkerboard feel.
Troubleshooting Common Problems (and Staying Safe)
Most problems come from pulling the thread too tight. If your fabric puckers, stretch the denim flat as you stitch and ease up on the tension; a gentle ripple is fine, but deep gathers are not. Uneven stitches are normal at first, so draw a fresh grid and let the lines guide your needle. If the thread tangles, cut shorter lengths of about 18 inches and let the needle hang free between stitches. Thick seams and hems are the hardest spots; stitch slowly and use a thimble. And remember, needles are sharp and irons are hot, so supervise younger kids and keep a first-aid kit handy.
Care and Gifting: How to Make Your Mend Last
To keep your mend looking fresh, wash the garment inside out on a gentle cycle and air dry it; the stitches soften with every wash and settle into the denim. If a thread wears through years later, stitch another row or two over the spot, because layered mends are part of the charm. A small mending kit, a spool of thread, a few needles, a thimble, and a patch or two in a tin, makes a thoughtful handmade gift for a denim-loving friend.
Your Free Printable
The free printable is a two-page PDF designed to sit beside you while you work. Page 1, “What You’ll Need,” is an 11-item checklist covering the garment, thread, needle, patch, scissors, marking tools, ruler, thimble, pins, and the optional iron, interfacing, and hoop. Page 2, “Step by Step,” is a 9-item checklist that walks you from washing the item and cutting the patch to stitching the grid, finishing the thread, and pressing the mended area flat. Print it, keep it nearby, and tick off each line as you go.
Grab a torn pair of jeans and your thread tonight, and you can have a mend to show off by the afternoon. If you try the pattern, share what you made; every grid turns out a little different, and that is the best part. Happy stitching.