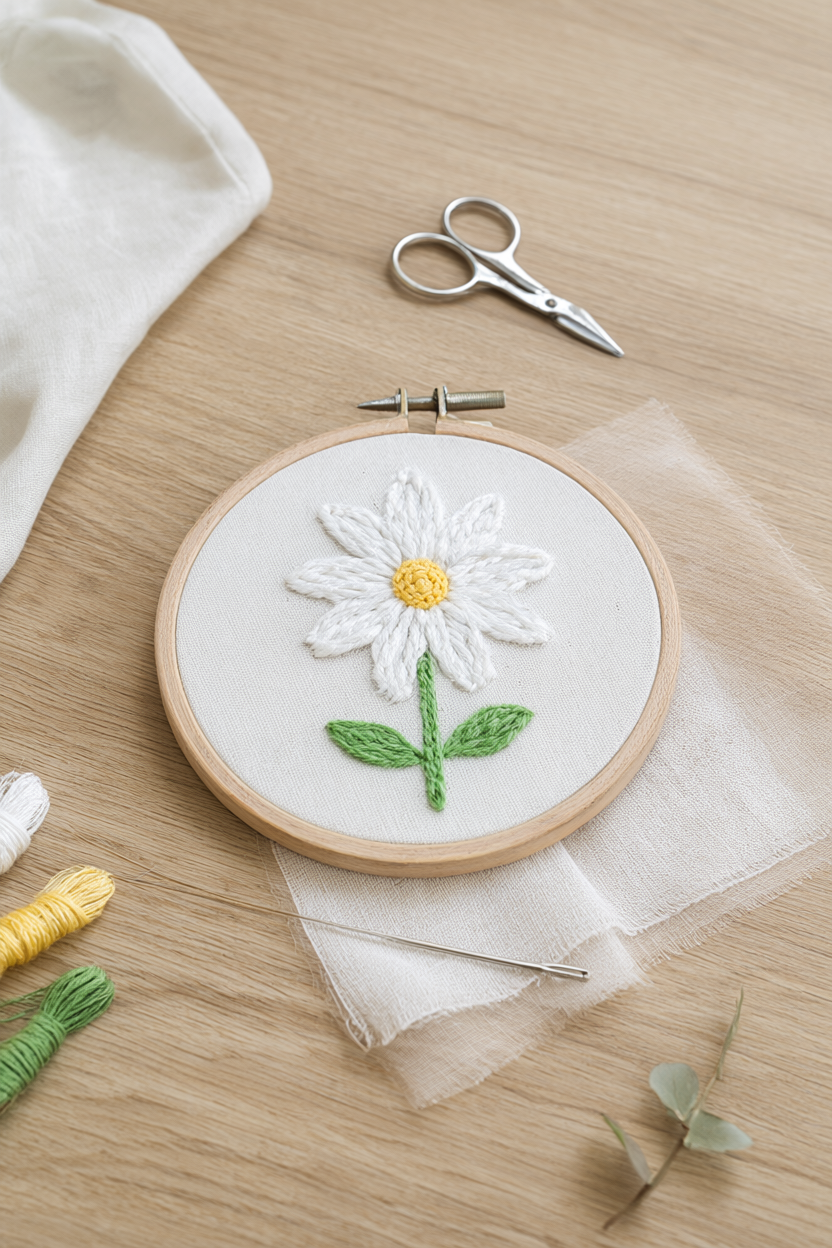
If you have ever wanted to try embroidery but felt overwhelmed by fancy stitches and long supply lists, this daisy hoop is the perfect first project. In one relaxed sitting you will stitch a white lazy-daisy flower with a butter-yellow French-knot center and a green stem onto a 6-inch wooden hoop. The honest time is about 1.5 to 2.5 hours of hands-on stitching, plus 5 to 10 minutes of drying after you erase the pen marks, with no curing or overnight waiting. A free printable supply list is included below, so you can gather everything in one trip and start today.
At a Glance
- Difficulty: Beginner; no prior experience needed.
- Hands-on time: about 1.5 to 2.5 hours, including setup and finishing.
- Drying time: about 5 to 10 minutes for the pen marks; no curing or overnight drying.
- Cost level: low; the supply list is short and inexpensive.
What You’ll Need
Everything fits in a small pouch, and most crafters already own the needle, scissors and hoop:
- 6-inch wooden embroidery hoop (1)
- Light cotton or linen fabric, 9 x 9 inches (1 piece)
- Embroidery floss, white (1 skein)
- Embroidery floss, butter yellow (1 skein)
- Embroidery floss, sage green (1 skein)
- Embroidery needle, size 5 to 7 (1)
- Small sharp scissors (1)
- Water-erasable fabric pen or fine pencil (1)
- Coin or small round lid to trace the flower center (1)
- Needle threader (optional)
- Ribbon or twine for hanging, 8 inches (optional)
- Iron (optional)
- Clean cloth (for erasing pen marks) (1)
- Fabric glue (optional)
Step-by-Step Instructions
- Press the fabric flat so it has no wrinkles. Loosen the hoop screw, lay the fabric over the inner ring, press the outer ring over it, and tighten until the fabric is taut like a drum; it should not sag or warp when you tap it.
- Mark the design. Lay the coin in the center of the hoop and trace around it with the fabric pen, then draw 5 evenly spaced rounded petals touching that circle. Below the flower, draw a gently curving stem about 3 inches long and two small leaf shapes beside it. Keep the lines light so they erase cleanly later.
- Cut about 18 inches of white floss and separate 2 of its 6 strands; thread the needle (use the needle threader if you have one) and tie a small knot at the long end. Repeat with 2 strands of green for the stem and leaves, and 2 strands of yellow for the center. Two strands keep the stitches crisp, not bulky.
- Stem: back stitch. Bring the needle up at the bottom of the stem and take small backward stitches about one-eighth inch each along the stem line up to the flower. Keep the tension light so the fabric does not pucker, then secure the thread at the back.
- Petals: lazy daisy stitch. For each petal, bring the needle up at the petal base, form a small loop of thread, and take the needle down right next to where it came up. Bring it back up just past the loop’s tip, then take one tiny stitch over the loop to anchor it. Work all 5 petals in white.
- Leaves: lazy daisy stitch again, this time with 2 strands of green. Make two shorter loops and anchor each one on the outside so it hugs the stem.
- Center: French knots. Bring the yellow needle up at the edge of the circle, wrap the thread twice around the needle, hold the wraps snug, and push the needle back down one stitch-width away. Repeat 6 to 8 times to fill the circle. If French knots feel fiddly, fill the circle with small satin stitches instead.
- Finish the back. Turn the hoop over and run the needle under a few existing stitches to secure each thread, then trim the tails. Skip bulky knots on the back; they can dent the front and show through when the hoop hangs.
- Erase the pen marks. Dab them with a barely damp cloth or press briefly with a warm iron, following your pen’s instructions, then let the fabric dry completely, about 5 to 10 minutes. Too much moisture can spread the ink, and too hot an iron can set marks instead of removing them.
- Finish and hang the hoop. Trim the excess fabric to about 1 inch, then glue, fold, or whip-stitch it to the back of the hoop. Tie an 8-inch ribbon into a loop around the hoop’s screw. Your hoop is ready to display or gift.
Why a Beginner Embroidery Hoop Is the Perfect First Project
An embroidery hoop wins on almost every count for a first project. The material list is tiny, there is almost no drying or curing time, and the project is portable, so you can stitch on the sofa, on a commute or in a waiting room. The hoop keeps the fabric taut while you work and doubles as the frame when you are done, so your finished piece is ready to hang the same day. Three simple stitches carry the whole design, so the result looks far more complicated than it is.
Easy Variations to Make the Daisy Your Own
Once you have stitched one daisy, the pattern is easy to remix. Swap the white petals for pink or lavender floss and the flower reads as a different bloom. You can also stitch the same motif on a tote bag or a denim pocket instead of a hoop, using the coin as your center guide. For a quick handmade gift, miniaturize the design on a 3-inch hoop and hang it as an ornament.
Troubleshooting Common Stitch Problems
A few small habits prevent most beginner frustrations. If the fabric puckers, your stitches are too tight: loosen the thread and let it rest on the surface rather than pulling hard. If the floss tangles or knots, cut shorter lengths, because 18 inches is far easier to manage than a long strand. If your back stitches look uneven, aim for stitches about one-eighth inch long and keep the spacing consistent. If you make a mistake, do not cut your work: slide the needle under the wrong stitch from the front, pull it free and re-stitch.
Care and Gifting Your Finished Hoop
Press finished work face-down on a towel so the stitches stay raised, and dust the hoop with a soft, dry brush rather than a damp cloth. Keep it out of harsh, direct sunlight, which can fade dyed floss over time. A handmade daisy hoop makes a lovely housewarming gift, a thoughtful thank-you for a teacher or a cozy little present for a book lover. Add a ribbon loop, wrap it in tissue paper and you have a personal gift that costs very little but carries a lot of heart.
Your Free Printable
The free printable that goes with this tutorial is a 2-page PDF. Page 1 is What You’ll Need, a 10-item checklist covering every material and tool, with the three floss colors called out. Page 2 is Step by Step, a 12-item action checklist from hooping the fabric all the way to hanging the finished hoop. Print it and tick the boxes as you go.
That is the whole project: one hoop, three floss colors and a handful of easy stitches. Take your time, enjoy the rhythm of the needle and be proud of the little daisy you made. Handmade things deserve to be seen, so hang your hoop where you will see it every day.