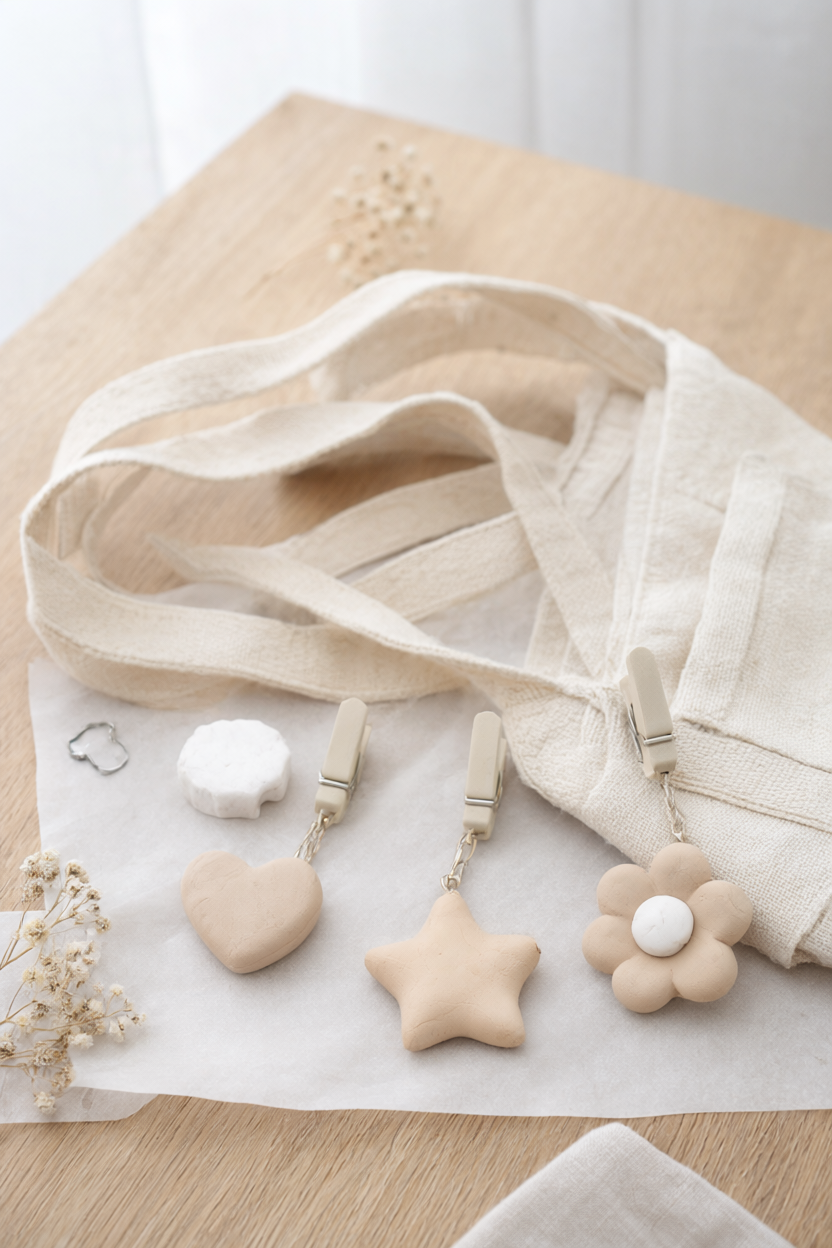
You can turn a single pound of air dry clay into three personalized bag charms — a heart, a star, and a flower — in one relaxed afternoon. It is one of the friendliest handmade gifts you can make: no kiln, no wheel, and no expensive equipment, just clay, a rolling pin, and a little paint. Plan on 1 to 1.5 hours of hands-on time, and a free printable supply list is included below so you can shop and craft without scrolling.
At a Glance
- Difficulty: Easy and beginner-friendly; take care with the craft knife and sealer fumes.
- Hands-on time: 1 to 1.5 hours.
- Drying and curing time: 24 to 72 hours for the clay, plus 1 to 2 hours for paint and sealer.
- Cost level: Low. Most tools are already in a kitchen drawer, and one pound of clay makes several gifts.
What You’ll Need
- Air-dry clay, 1 lb (white or stone)
- Rolling pin
- Parchment paper
- Small cookie cutters (heart, star, flower)
- Craft knife or clay tool
- Plastic straw (5-6 mm hole)
- 220-grit sandpaper
- Acrylic paint, 3 colors
- Small paintbrushes, 2 (flat and detail)
- Clear acrylic sealer for clay crafts
- Foam brush for sealer
- Jump rings, 6 (10 mm)
- Lobster clasps or keychain rings, 3
- Jewelry pliers, 2 pairs
- Damp cloth
Step-by-Step Instructions
- Knead the clay for 1 to 2 minutes until it feels smooth and pliable. Roll it to about 1/4 inch (6 mm) between two sheets of parchment paper. Even thickness matters more than anything else here, because thin spots are the main cause of cracks later.
- Cut three shapes with small cookie cutters, or trace around a cutter with a craft knife if the shape is fiddly. Re-roll the scraps and cut one spare charm in case a piece breaks during drying or assembly.
- Poke a hole about 1/4 inch from the top edge using a plastic straw. Wiggle the straw gently so the opening comfortably fits a jump ring, then smooth the inside rim with a damp finger. A snug hole is fine; a hole that is too small is not.
- Dry the charms flat on parchment for 24 to 72 hours, turning them over after the first 12 hours so both faces dry evenly. Thin shapes are usually ready in 24 hours, while thick pieces or humid weather can stretch to 72. They are ready when they feel hard and the color is uniform, with no cool or dark patches.
- Sand the edges with 220-grit paper until they feel smooth, then wipe away the dust with a damp cloth. Dust left on the surface will show through paint and can keep the sealer from bonding.
- Paint two or three thin coats of acrylic paint with the flat brush, using the detail brush for dots, stripes, or a simple border in your other colors. Let each coat dry for 20 to 30 minutes. Thin coats look better and last longer than one thick coat. Keep paint out of the hole and wipe the rim clean with a damp cloth before it dries.
- Seal the charms with two thin coats of clear acrylic sealer, applied with the foam brush, in a well-ventilated area, ideally outdoors or near an open window. Follow the label for the recoat time, usually 20 to 30 minutes, and let the pieces cure fully before handling them.
- Twist a jump ring open with two pairs of jewelry pliers, thread it through the clay hole and the lobster clasp or keychain ring, then twist it closed again. Attach the finished charm to a tote strap, a bag ring, or a zipper pull. Keep the craft knife, pliers, and sealer away from young children, and never let children handle the sealer.
Why Air Dry Clay Gifts Make an Easy, Personal Present
Air dry clay is one of the few crafts that works with what you already own. A rolling pin, a straw, and a few cookie cutters from the kitchen drawer cover most of the tool list, and a one-pound block of clay costs less than a single store-bought charm. Because you cut and paint each shape yourself, you can match a friend’s favorite color, add a letter stamp, or make a set that suits one specific bag. There is no kiln and no firing schedule, so the whole project fits into a napkin-sized workspace and a normal weekend. That combination — low cost, real customization, and almost no specialized equipment — is what makes these charms such an easy gift to actually finish.
Shape and Color Variations to Make Each Charm Unique
Once you have the basic process down, the shapes are where the fun starts. Hearts, stars, and flowers are the classic trio, but small fruit shapes, leaves, moons, and simple circles work just as well. For a two-tone look, press a small ball of colored clay into the base shape and roll gently before cutting, or marble two colors together for a soft swirl. Painted dots, thin stripes, and a simple border are easy ways to add detail without a steady hand. If you have small letter stamps, press a single initial into the clay before it dries for a truly personal touch. Keep a damp cloth nearby and clean your cutters between colors so the edges stay crisp.
Troubleshooting: Cracks, Curling, and Flaking Paint
Most problems with air dry clay come from three things, and all of them are fixable. Cracks usually mean the clay was rolled unevenly or dried too fast; roll to a consistent 1/4 inch and dry the charms away from direct heat, radiators, and bright sun. If a crack appears while the clay is still slightly damp, smooth it with a wet finger and let it dry again. Curling happens when the top dries faster than the bottom, so turn the pieces at the 12-hour mark and keep them flat on parchment rather than on a rack. Flaking paint almost always means the clay was dusty or unsealed; sand and wipe the surface, and always seal both sides of the charm. If paint does flake on a finished piece, sand the spot lightly, repaint, and reseal.
Safety, Care, and Gifting Your Charms
Two safety habits make this project stress-free. First, ventilate: work with the acrylic sealer outdoors or beside an open window, and let the charms cure fully before you wear or gift them. Second, keep the craft knife, pliers, and sealer out of reach of children; older kids can help with rolling, cutting with plastic cutters, and painting. Seal every side of each charm, including the back and the inside of the hole, because an unsealed surface absorbs moisture and dulls the paint. To clean a finished charm, wipe it with a barely damp cloth and dry it immediately; never soak it or put it in the dishwasher. When you give a set, pack the charms in tissue paper with a small handwritten tag that names the shape and reminds the recipient to keep it dry.
Your Free Printable
The printable is a two-page PDF designed to sit on your work surface while you craft. Page 1 is a 15-item supply checklist covering clay, shaping tools, paint, sealer, and charm hardware, so you can gather everything in one pass. Page 2 is an 8-action step checklist that follows the project from rolling and drying through painting and attaching, with room to tick off each stage as you go.
Print it once, keep it with your clay, and the next rainy afternoon already has a plan. Make a set for yourself, make a set for a friend, and let the handmade tag do the rest.