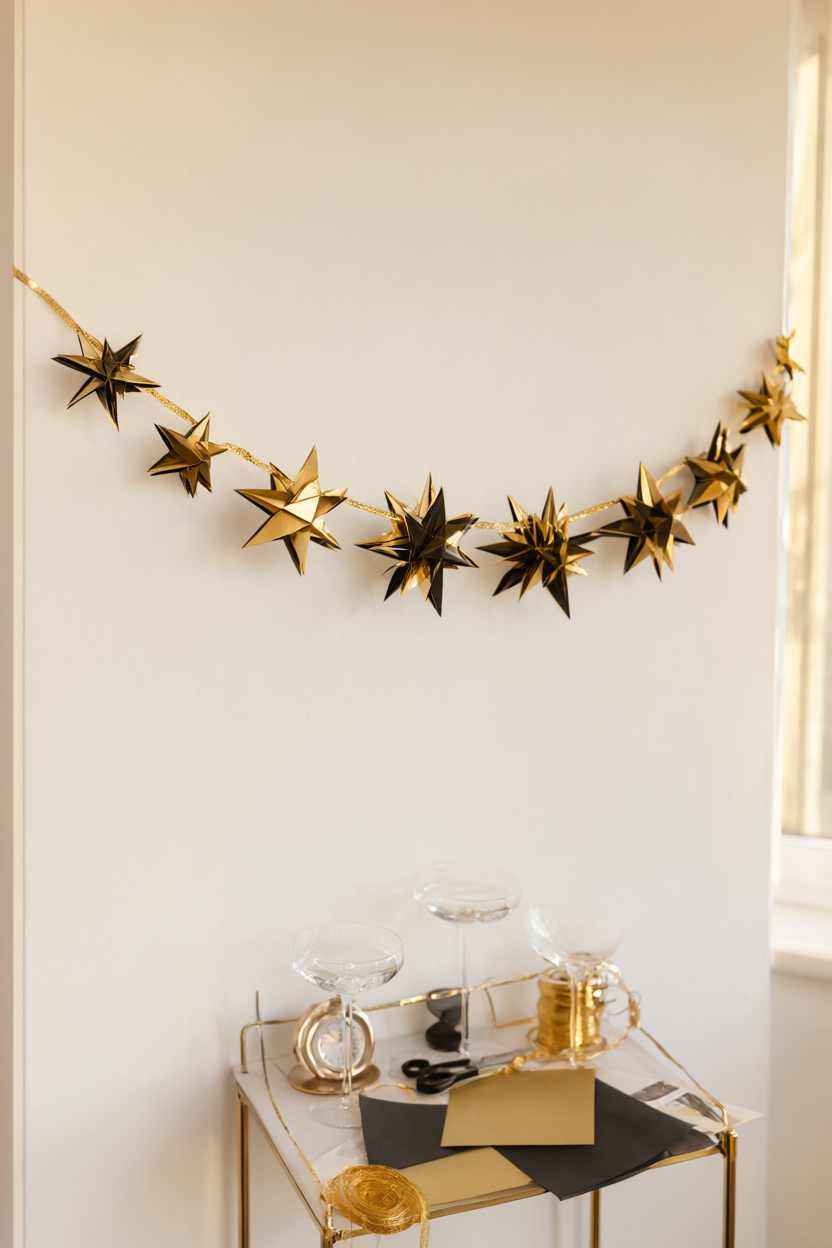
Gold and black paper stars look expensive hanging over a bar cart, and nobody has to know they started as six sheets of cardstock. This garland is the rare New Year’s Eve decoration that packs flat, goes up in minutes and still reads across a crowded room at midnight. Budget 70 to 80 minutes of hands-on work for eight stars, plus 20 to 30 minutes of drying if you use craft glue, and print the free supply list at the bottom so you only shop once.
At a Glance
- Difficulty: Easy and beginner friendly. Kids can help trace the stars and punch the holes.
- Hands-on time: 70 to 80 minutes for eight finished stars.
- Drying time: 20 to 30 minutes if you use craft glue, none at all with a glue stick.
- Cost level: Low. Six sheets of cardstock, a spool of ribbon and glue you probably already own.
What You’ll Need
Everything on this list comes from a craft shop or a stationery drawer. The quantities make eight stars and one six-foot garland, with cardstock left over for mistakes.
- Gold cardstock, 12 x 12 in (3 sheets)
- Black cardstock, 12 x 12 in (3 sheets)
- 5-point star template, about 3 in (7.5 cm) across (print at 100% or draw your own)
- Pencil
- Scissors
- Bone folder or used ballpoint pen, for scoring
- Glue stick or clear-drying craft glue
- Gold ribbon or baker’s twine, 1/8 in (3 mm) wide, 6 ft (1.8 m)
- Small hole punch, 1/16 in (1.5 mm)
- Clear tape or small adhesive hooks
- Ruler
- Cutting mat (optional)
Step-by-Step Instructions
The order matters less than you would think, but punch the holes only after both layers are glued, because one squeeze through both keeps them lined up.
- Print the star template at 100% or draw a five-point star about 3 in (7.5 cm) across on scrap paper, then cut it out. Trace 16 stars onto the cardstock, eight on gold and eight on black, and cut them out with scissors. Turn the template rather than the paper so every star comes out the same.
- Take eight of the stars, four gold and four black, and cut a straight slit from the center to one inner corner. Overlap the two cut edges by about 1/4 in (6 mm) and glue them. The star cups slightly toward you, and that shallow curve is what gives the finished piece its dimension. Hold each seam for a few seconds so it does not spring open.
- Glue each cupped star onto a matching flat star, lining up the centers rather than the points, and press for about 30 seconds until the glue grabs. Small misalignment at the tips is normal and disappears at arm’s length. If you used craft glue, let the stars dry flat for 20 to 30 minutes before you punch or thread them.
- Punch a small hole about 1/4 in (6 mm) below the top tip of each star, going through both layers in one squeeze. Punch before threading so the holes line up, and clear the punch after every few stars so paper confetti does not jam the mechanism.
- Cut 6 ft (1.8 m) of ribbon. Mark 6 to 8 in gaps with the ruler, thread the stars on at those marks, and tie a small knot under each star so it stays where you put it. Leave a longer tail at each end than you think you need, because you will want it for the hanging loops.
- Tie a loop at each end and hang the garland with clear tape or small adhesive hooks above a bar cart, dessert table or doorway. Turn every knot to the back and nudge the stars until they hang upright and evenly spaced. Step back and check the line before you commit to the tape.
- For a fuller midnight backdrop, make eight more stars from the leftover cardstock and thread them on a second 6 ft (1.8 m) length of ribbon, then hang it about 10 in below the first, starting its stars halfway between the top row’s stars. The offset makes two simple garlands look like one layered installation.
The only sharp things here are the scissors and the hole punch, so keep the punch away from very small helpers and cut slits on a mat. Check that the tape or hook holds before the party starts, not after.
Why This Garland Works for New Year’s Eve
Paper catches warm light better than plastic or foil, so eight stars on a six-foot ribbon glow without a single bulb. Because every star is cupped, the gold face angles toward the room while the black edge fades once the lights go low. The garland weighs almost nothing, so one strip of tape holds it, and it comes down in under a minute.
Hang it where people already gather: above a bar cart, over a dessert table or in the doorway between the kitchen and the living room. If your room is large, plan two rows from the start, because the second row takes half the time of the first.
Variations: Midnight Blue, Silver and Mixed Metals
If gold and black is not your palette, swap the black cardstock for midnight blue and the gold for silver, and the garland still reads from across the room. Mixed metals work well too: alternate gold, copper and champagne stars on one ribbon for a warmer, less graphic look. Glitter cardstock sheds onto the glue seam and clogs a small punch, so save it for the flat top layer.
A small “Happy New Year” banner strung between two stars ties the decoration to the occasion. Cut the letters from leftover cardstock, punch a hole in each and thread them on the same ribbon so the banner hangs level with the stars.
Troubleshooting: Spinning Stars, Bent Points and Glue Shine
Stars that spin or hang sideways almost always have the knot in the wrong place. Slide the knot so it sits directly behind the star and punch the hole slightly closer to the tip, and the star will lie flat against the ribbon instead of twisting. Bent points usually come from folding dry cardstock with no crease line, so score along the fold with a bone folder or a dead ballpoint pen first and then fold gently.
Shiny glue along the seam means you used too much. A glue stick applied sparingly and pressed for 30 seconds dries clear, and craft glue wiped with a fingertip before it sets dries nearly invisible.
Care, Storage and Safety for a Paper Garland
At the end of the season, lift the garland down by its loops rather than pulling the ribbon, lay it flat and slide it into a large folder or a shallow box. Paper stars crush easily, so never coil them around a spool, and keep the folder away from damp. Keep the garland away from candles and open flames, and do not hang it over a fireplace or beside hot bulbs.
On painted walls, use removable adhesive hooks rather than clear tape, and test one hook with the full weight of the garland overnight. Ordinary tape can lift the finish when it comes down.
Your Free Printable
The PDF has two pages. Page 1 is a 12-item checklist of cardstock, the star template, tools, ribbon, hole punch and hanging supplies. Page 2 is an eight-step action list that takes you from tracing the stars to spacing the finished garland. Print it, tick the boxes as you go and keep it with your template for next December.
That is the whole project: six sheets of cardstock, an evening of tracing and gluing, and a backdrop that looks like it cost far more than it did. Hang it early, turn the knots to the back, and let the gold do the rest. Happy New Year.